Image formats
JPG vs PNG: Which Is Better for Screenshots, Text and Photos?
Choose JPG or PNG for screenshots, text and photographs. Compare readability, transparency and file size, with practical export steps and common mistakes.
JPG vs PNG: choose for the image, not the extension
JPG and JPEG are two extensions for the same format. In ordinary photo exports, JPEG uses lossy compression: it can reduce file size by discarding information. PNG stores image data with lossless compression and supports transparency. This makes PNG a useful starting point for content with clean edges, while JPG is often a practical choice for photographs.
Lossless encoding does not mean every PNG conversion preserves everything about its source. Resizing, color processing or an earlier lossy export can already have changed the pixels. Saving that result as PNG cannot recover missing detail. The PNG specification documents the format’s lossless compression and transparency.
| Image | Start with | Check carefully |
|---|---|---|
| Screenshot of an app or document | PNG | Small text and thin lines |
| Photograph without transparency | JPG | Fine detail, shadows and file size |
| Transparent product cutout | PNG | Edges on light and dark backgrounds |
| Photo with labels or a chart | Compare both | Readability of the smallest important label |
| Form that requires JPEG | JPG | Accepted format, dimensions and size limit |
Why PNG is usually better for screenshots and text
A screenshot often contains repeated colors, fine lines and abrupt transitions between letters and their background. The important details are small: a decimal point in a chart, an error message or a thin outline around a button. A lossy JPEG export can introduce soft edges or visible marks around those details.
For a support ticket or step-by-step tutorial, readable text should take priority over a marginal size saving. Capture the screenshot at its original resolution, crop out irrelevant areas and save a PNG copy. Avoid shrinking the entire desktop until its text becomes unreadable. A tighter crop can reduce the amount of image data while leaving the useful part at its original size.
PNG is a starting point, not a rule that every screenshot will be small. A screenshot dominated by a photograph, a game or a detailed map may be large. Try JPG if you need a smaller file, but check the smallest text rather than judging only the photographic area. If that text is essential, keep the PNG or split the content into a clear screenshot and a separate photograph.
Compare actual exports before assuming JPG will be smaller. This opaque text-and-lines graphic starts at 109.2 kB. Pixilo’s homepage compressor produces a 20.6 kB PNG with the same decoded pixels and 960 × 640 dimensions. The PNG-to-JPG converter produced a 47.0 kB JPG at quality 80 from the same original. JPG is about 128% larger than the optimized PNG here; it only looks smaller when compared with the unoptimized source.
Move the divider across the lettering and colored edges. Look for softened strokes, faint fringes and changes around one-pixel lines. The initial detail view enlarges pixels 2×; switch to the full image to judge readability at an ordinary viewing size. Quality 80 is an encoder setting, not “80% of the original detail.” This is one graphic, not a prediction for every screenshot or photograph.
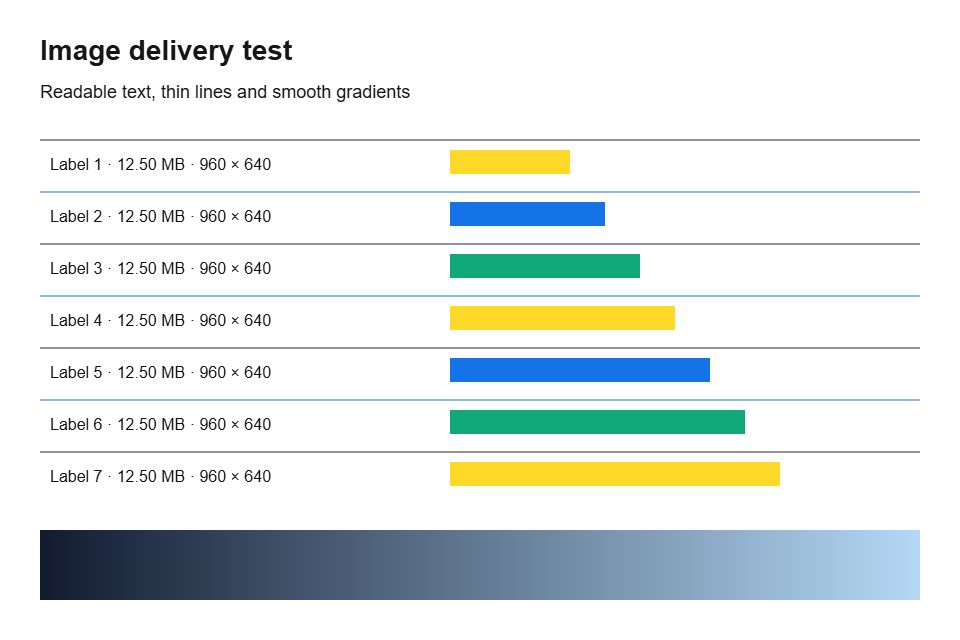
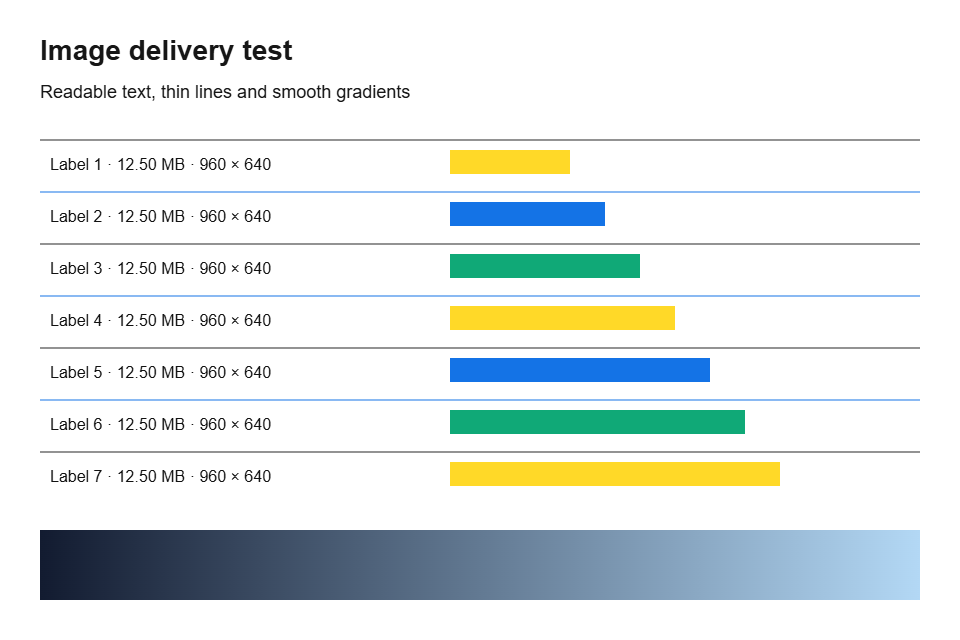
PNG optimized losslessly. JPG exported with Pixilo at quality 80; both 960 × 640 px. Drag the divider or use the arrow keys to compare.
Why JPG often makes more sense for photographs
Photographs contain many subtle changes in color and brightness. Keeping all of that pixel information in PNG can produce a large file without a visible benefit for ordinary sharing. A carefully chosen JPG export can be much smaller while still looking suitable at the size a reader will see.
Inspect faces, hair, leaves and fabric before deciding how far to reduce quality. Smooth skies and dark backgrounds also deserve attention. A version that looks acceptable as a thumbnail may look poor in a full-width gallery. Export for the intended destination rather than choosing one quality setting for every picture.
For website delivery, JPG and PNG are not the only options. You can also test WebP or AVIF while retaining an appropriate fallback. See AVIF vs WebP for a comparison workflow. For a recipient who specifically needs JPEG, compatibility can matter more than achieving the smallest possible export.
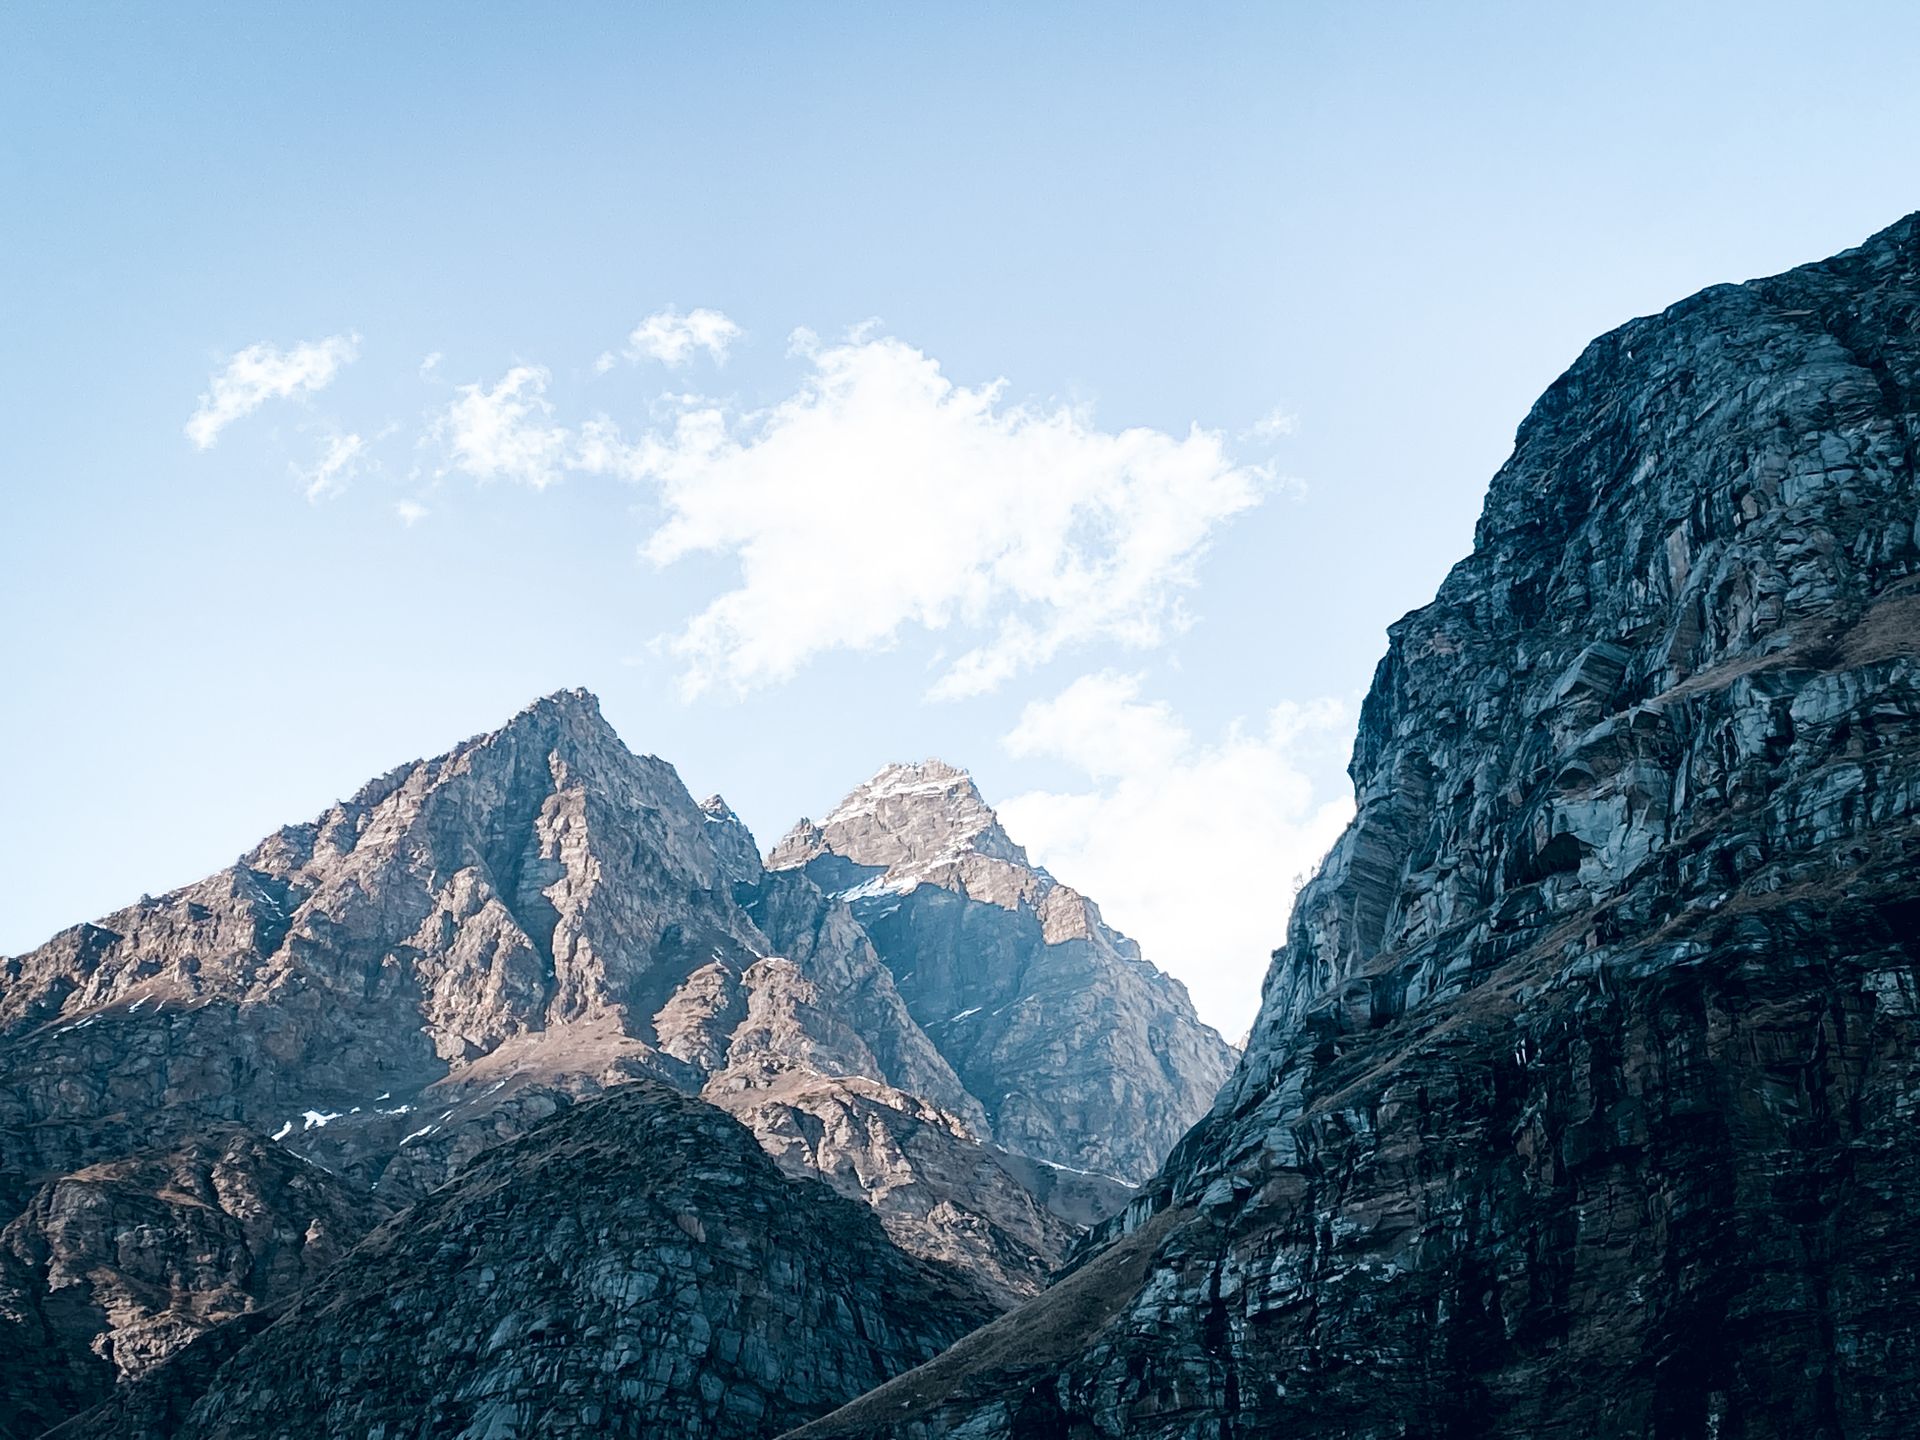
The mountain photo below is a practical counterexample to the graphic above. Its original JPG is 413.1 kB. Pixilo’s JPG-to-PNG converter created a 4,113.8 kB PNG; lossless homepage optimization reduced that PNG to 2,860.5 kB with unchanged decoded pixels. Both formats are 1920 × 1440. Even after PNG optimization, the file is about 6.9 times the size of the JPG, without recovering detail lost in the original JPEG.
What happens to a transparent background?
PNG can retain transparent areas; an ordinary JPG cannot. Converting a transparent logo or product cutout to JPG requires a solid background. Decide which background you want before conversion, particularly when the image will appear on a dark page or colored slide.
Use the background color tool to make that choice deliberately. Then inspect the edge of the subject. A cutout prepared against white may have pale edge pixels that become obvious against black, even when the file still contains transparency.
A white or black preview does not prove that a background is permanently part of a PNG. Some viewers place transparent pixels over a solid color. Read the transparency troubleshooting guide before changing a file that may already be correct.
How to handle images containing both photos and text
Presentation slides, social graphics and infographics often combine a photograph with labels. Ask what would make the image unusable. If the photograph looks slightly softer but the labels remain clear, a JPG may be acceptable. If a small number or instruction becomes hard to read, the size saving is not useful.
Compare at the final display size and at 100% zoom. Pay special attention to colored lettering on a contrasting background and very thin lines. If you control a website, consider keeping explanatory text as real page text rather than baking it into a photograph. This makes it easier to read, select and adapt to different screen widths.
For logos and simple diagrams, an existing SVG may work better because its vector shapes stay sharp when resized. That is a separate workflow: converting a small PNG into another raster format does not turn it into a vector drawing. The MDN image format guide provides an overview of these options.
Here, 100% means viewing the image at its actual pixel size in an image viewer: one image pixel is shown as one screen pixel. The browser’s page zoom is a separate setting.
A practical JPG and PNG workflow in Pixilo
- Keep the original. Create a separate copy for sharing or publication. Use a filename that distinguishes the copy from your source.
- Crop before shrinking. For screenshots, use Crop image to remove unused space while retaining readable details.
- Choose dimensions deliberately. Use Resize image when the source is larger than the destination needs. Preserve its proportions and recheck text after resizing.
- Convert only if it solves a problem. Use PNG to JPG for a photographic PNG or a JPEG-only upload. Set a background first if transparency matters.
- Adjust and inspect. The PNG-to-JPG converter offers a quality slider. Check the downloaded file rather than assuming the slider’s default is right for your content.
- Verify the destination. Upload or open the copy where it will be used. A messaging app or publishing system may resize or recompress it again.
Pixilo’s JPG-to-WebP, PNG-to-WebP, PNG-to-JPG and WebP-to-JPG converters offer a 4000-pixel limit on the longest side, enabled by default. Check the resize option: for a format-only comparison, keep pixel dimensions equal. This does not apply to every converter: JPG-to-PNG preserves dimensions within its input limits. Keep the original separately if you need its metadata, color information or full resolution.
What if the PNG is too large?
Start by removing content the reader does not need. A cropped error message may be more useful than a full-screen screenshot. Then consider the required dimensions. For a screenshot, reducing dimensions too far can do more harm than keeping a slightly larger file.
Try lossless PNG optimization before changing format. It can reduce inefficient storage without sacrificing lettering, as the graphic above shows. The amount saved depends on how the source was encoded; an already optimized PNG may barely shrink. Retaining PNG is a valid result when its size meets the requirement.
If a form has a strict upload limit, confirm whether it also specifies a format or minimum dimensions. Converting to JPG is one option, but it is not appropriate when transparency or precise text edges must be retained. The guide to reducing an image to a file size limit explains how to balance those requirements.
Do not judge efficiency by extension alone. A small, simple PNG can be smaller than a JPG with the same dimensions. Compare actual exports from the same source and choose the smallest version that still meets your purpose.
Does choosing JPG or PNG affect image SEO?
Google supports both formats. Choose for readability, loading needs and compatibility, rather than expecting one extension to improve rankings. Use a descriptive filename, relevant alternative text and an image that supports the surrounding page. See Google’s image SEO guidance.
For tutorial screenshots, make important instructions available in the page text too. Alternative text should explain the image’s purpose; it does not need to reproduce every menu item visible in a screenshot. A caption can supply context where a reader needs it.
Frequently asked questions
Will saving a JPG as PNG improve its quality?
No. A PNG can store the decoded image without another lossy encoding step, but it cannot restore information removed by the original JPEG compression. It may simply produce a larger file.
Should I use PNG for every screenshot?
It is a good starting point for text and interface details. For a screenshot dominated by a photograph, compare a JPG too. Keep whichever version remains readable and fits the destination.
Can I reduce JPG quality repeatedly until it fits?
Make each trial from the original rather than from the previous compressed copy. Repeated lossy exports can accumulate visible damage. Check dimensions as well as quality.
Why does my PNG look blurry even though PNG is lossless?
The image may have been resized, captured at a low resolution or created from an already blurry source. Lossless compression preserves those pixels; it does not make them sharper.
Make a copy that fits your destination
For a photographic PNG or a JPEG-only form, create a JPG copy and check its quality before replacing anything.
Convert PNG to JPGAdjust image dimensions → ChatGPT
 Grok
 Google
 Perplexity
 Claude